November 21, 2009
November 18, 2009
Blog Backgrounds!
So as you can all see I make my own blog backgrounds. I just started figuring out how to do it but I wanted to try and make some generic ones for you to snag. I have so many cute graphics and papers that I have aquired from some fantastic fellow bloggers that I will name when I attempt to make these blog backgrounds. I hope to have the first one up soon but it depends on how quickly I can learn the correct formatting for you to snag them! Looking forward to sharing with you!
November 17, 2009
Live in the Moment
I saw this idea on somewhatsimple and I just had to share it! She loves this saying but did not like the picture so she made it her own. I took that same concept and make it my own as well. I still need to print it and frame it but I love the way it turned out!
November 15, 2009
My Next Project
So I have kind of been in a funk lately and have not been able to think of any new and cute craft ideas. So I set out on a mission to find a cute idea from all my fellow mom crafters out there and I think I have found it! My friend is the one who originally e-mailed me and once I found the original link I have discovered so many sights that have done this since it is so cute.
It is called "Family Rules Canvas." It is a cutem fun way to display your "family rules" of the house. I am so excited to try it out and will post as soon as I can find a canvas, since I always re-furbish them from thrift stores). If you would like to make your own, check out the awesome tutorial at The Pleated Poppy
November 7, 2009
Veterans Day Custom Photo Graphic
So I was thinking of a cute way to say thank you to my hubby on this Wednesday, Veterans Day. My hubby served for 5 years in the military and this is his first Veterans Day since he has been out so I wanted to make it special. As I was making this photo graphic I thought how cute it would be to make it a custom offer! I am offering this free since this is my first one. I can customize it to 2 or 3 pictures and change the saying at the bottom if you want it personalized (Daddy, Hubby, etc.) Just e-mail me at thecraftygirl_09@yahoo.com with the details and I'll make it as soon as I can! Enjoy and Happy Veterans Day!
November 6, 2009
My First Painting!
So I finished my very first painting today. I was a little skeptical since I am not a very good painter or any kind of artist for that matter, but my husband encouraged me so I did it. I went to the local consignment store (after a tip from my mother-in-law) and bought a used frame and canvas for only 8 dollars! I took the canvas off the frame and painted directly over the canvas, having to do a few base coats to cover the previous picture. I sanded down the frame and spray painted it with a basic black paint. All in all I think it turned out pretty good, especially for the price! I hope this inspires you to do your own! Enjoy!
November 5, 2009
Cute & Easy Outlet Covers
As most of us moms know, it is always important for us to protect our kids from the dangers in our house. Cleaners, knives, outlets, etc. Well I have found a great idea to cover the outlets in a very cute way. It is so simple and so cute for your kids rooms! Just glue those fabricated, pre-painted wooden shapes that you find at your local craft store onto a plastic outlet cover. Head over to Little Birdy Secrets to see picures in instructions (if you even need them). I am going to go run out and do this myself! Enjoy!
The Cutest Fonts Ever!
Do you like the adorable fonts that I use for my page? If so than I am giving you an insider tip and telling you where you can get them too! From adorable fonts to scrapbooking fonts, you can even get one made from your very own handwriting to make your blog ultra personal. if any of this sounds appealing to you than head over to Kevin and Amanda. They have so many cute fonts for you that are all free! So head on over and check them out! I'm glad I did!
November 4, 2009
Snow Page
I did an adorable scrapbooking page the other day of when my husband and I took our daughter to Colorado to see the snow. This was January 2008, yes I am that far behind! I know I have a lot of catching up to do but after you see this page you can see why i am so far behind. Sometimes I get a little too detailed but I love the finished product so much I can't help it! Enjoy!
P.S. I hand sewed all the snowflake charms on the page.
Wedding Projects
So I know I have not posted in awhile so I figured I would update with everything I have being doing. I have not done too many crafts lately since my daughter and I have been busy with many activities. The things I have done I am really proud of though.
On September 18 my best friend in the whole world married my husbands best friend. I introduced them almost 4 years ago and we were so excited when they got married. I am so glad that I was a part of her special day, especially since I was able to help her with all the detailed crafts for her wedding and bachelorette party.
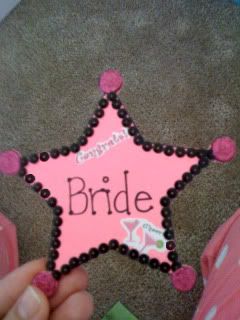
The first thing I did was the bachelorette party. She decided she wanted a cowgirl theme and we all went to this fun cowboy bar in the area. I decided to make name badges of all the girls roles in the wedding: Bride, Maid of Honor, Bridesmaid, etc. I found these adorable wooden sheriff badges and painted them with pink paint I already had. Then I added black sequins around the edge and wrote the appropriate role in the middle. They turned out so cute and the girls loved them and they cost under $2 each!
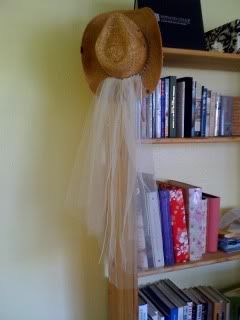
I really wanted to do something special for the bride at her bachelorette party. I decided to take a veil and sew it on the back of a cowgirl hat for her to wear to the party. She loved it!
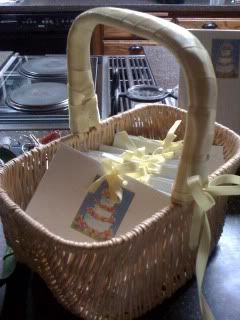
For the wedding we did a few more projects. We decorated a basket for the maps from the ceremony to the reception. The maps were printed on cute card stock and we tied them closed with a 1/2 inch yellow satin ribbon.
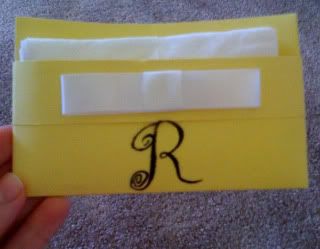
For the Mother of the Bride and the Mother of the Groom we decided it would be special to make them a cute tissue pack. We folded pieces of yellow card stock into a pocket, stuck the tissues inside, and placed an "R" sticker on the front for their last name. It made the moms cry even more.
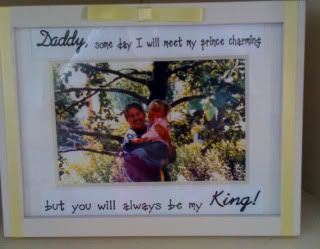
The last special touch we did was a tribute to the brides father who passed away. We wanted to have a space for him as though he was there. I took a plain white frame that the bride purchased and glued yellow satin ribbon to either sides of the frame and a boy at the top. I printed writing on card stock to attach to the matting of the frame. We inserted a picture of her and her dad and placed it on a chair during the ceremony for him to watch over her on her very special day.
I had so much fun doing Amanda's wedding and I hope to do more weddings soon!
Subscribe to:
Posts (Atom)